InfoGrasp- General Users Guide
Introduction
This document is intended to give you an introduction to the general features of InfoGrasp. The primary goal of InfoGrasp is to make it easy to enter and access the information you need.
Brief Explanation of Databases
Your information is stored in a database so here is a very brief explanation of databases.
It is not necessary to fully understand this information to use InfoGrasp.
§ A database enables you to insert, update, delete and query information.
§ The information for each entity, such as a Household, Student or Payments is stored in a separate table.
§ The type of information to be stored for each entity is specified in the table's columns, such as First Name, Last Name, and Phone Number. A column is sometimes referred to as a field.
§ Each row of a table represents a distinct entity. If you had 100 students in your school, there would be 100 rows in the student table. Each row of a table is uniquely identified through a piece of data called a key. A row is sometimes referred to as a record.
§ Tables are often related to each other. For example a Payment will be related to the Household that made the payment by storing the key of that Household in the Payment table.
§ A language called SQL (Structured Query Language) enables you to issue commands to Insert, Update, Delete and Select information from the tables in your database.
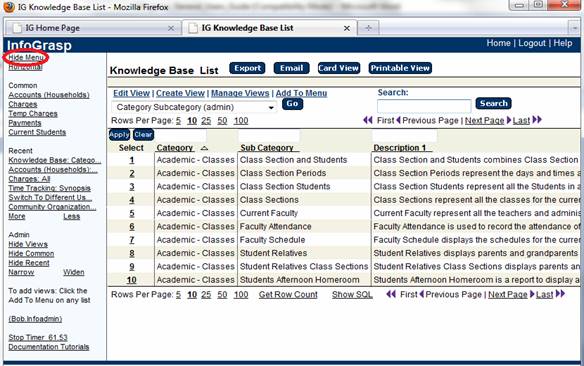
InfoGrasp Overview
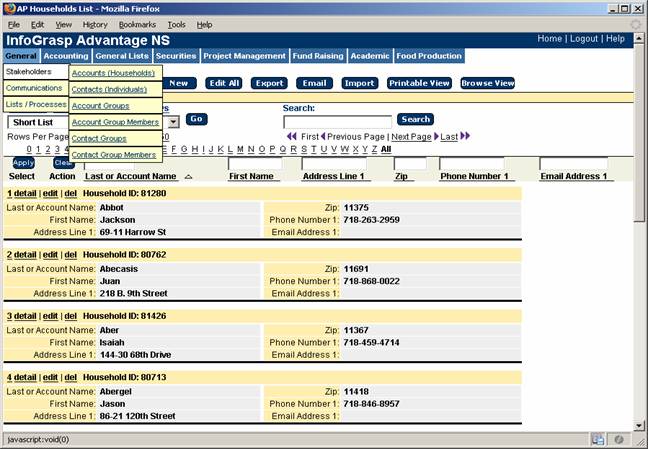
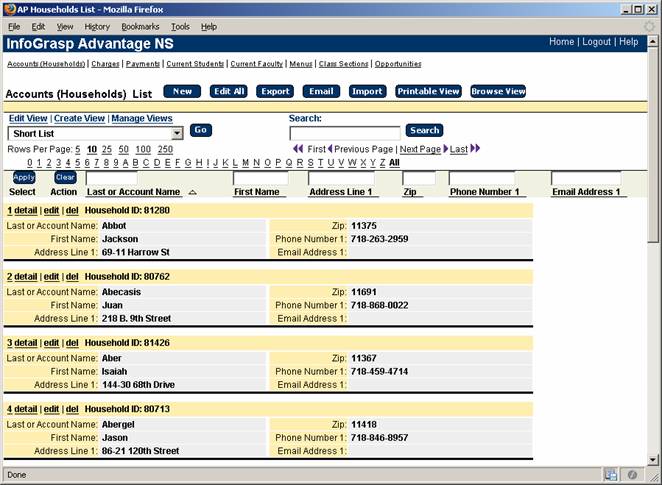
InfoGrasp primarily displays information in lists.
Each list is called a transaction. The information in the lists can be manipulated by selecting which columns, which rows and in what order to display the information.
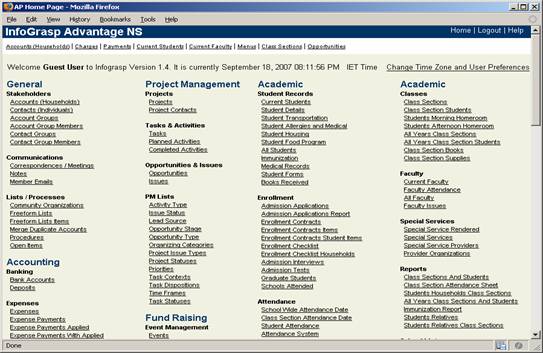
When you log on to InfoGrasp, the first screen you will see is the homepage. You can access all the transactions by clicking on links on the homepage.
The ways to view the information in lists include:
1. Browse.
2. Card.
3. Printable.
4. Calendar.
You can create custom views of your own lists, save them and share them with other InfoGrasp users.
Logging into InfoGrasp
On your browser, paste the following address into your address bar: https://customer.infograsp.com/apps/login.jsp.
It’s a good idea to bookmark this address.
Sign in to your InfoGrasp Account.
Home Page
Time Zone and User Preferences
On the top right corner of the homepage, you can click on Change Time Zone and User Preferences. You will see the following pop-up screen:
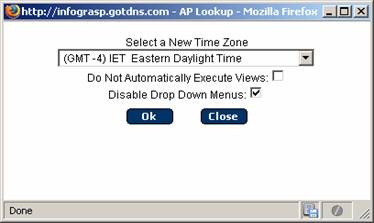
You can change your time zone and user preferences:
1. Set your time zone.
2. Click Do Not Automatically Execute Views to insure that data is not automatically retrieved or views are not automatically executed.
3. Click Disable Drop-Down Menus to disable the drop down menus available on each page and show selected frequently used transaction links.
Navigation
Clicking on links on the homepage is one of the main ways to access transactions. On the top right corner of every page, there is a link to return to the Home Page.
Drop Down Menus
A drop down menu appears on the top left corner of every page if you have drop downs that have not been disabled on the Time Zone and User Preferences page.
Navigation Menu
InfoGrasp enables you to utilize a Navigation menu where you can easily navigate to commonly-accessed parts of the system.
When the navigation menu is hidden, clicking on Show Menu on any page will show the
navigation menu.
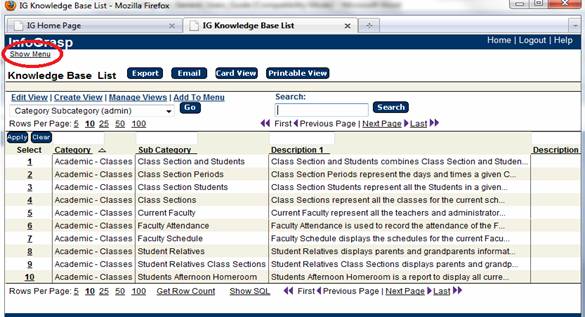
If you click on Hide
Menu, the navigation menu will be hidden.
If you mouse over any item on the Navigation Menus, a tool
tip will display with the full name of the transaction or a description of the
link's function. Try it!
Clicking on Horizontal will display
the navigation menu across the top of the page.
Clicking on Vertical will display
the navigation menu down the left side to the page.
Clicking Narrow will narrow the
width of the items in the menu by 5 characters to a minimum of 15.
Clicking Widen will narrow the width
of the items in the menu by 5 characters to a maximum of 45.
There are now three sections to the navigation menus, Views, Common and Recent.
Views section - displays views that
you have added to your menu.
If you click the Add to Menu link
(above the Go button) from any transaction list, the current view will be added
to your navigation menu.
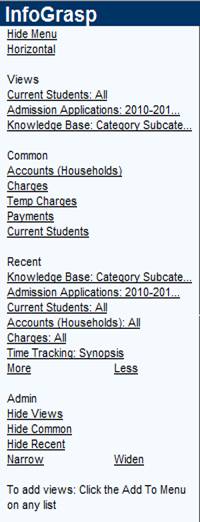
If you click the Remove from Menu
link (above the Go button) from any transaction view that is currently in your
navigation menu, the current view will be removed from your navigation menu.
If you have added views, but want to hide the entire Views section, click the Hide
Views link and the section will be
hidden.
To show the Views section, if it was
hidden, click on the Show Views
link.
Common section - displays commonly
used transactions defined by the InfoGrasp system administrators.
To hide the entire Common section, click the Hide Common link.
To show the Common section, if it was hidden, click on the Show Common link.
Recent section - displays the views
you have recently used.
To hide the entire recent section, click the Hide Recent link.
To show the Recent section, if it was hidden, click on the Show Recent link
Clicking More will increase the
number of recent items in the navigation menu by 3 to a maximum of 12.
Clicking Less will decrease the
number of recent items in the navigation menu by 3 to a minimum of 3.
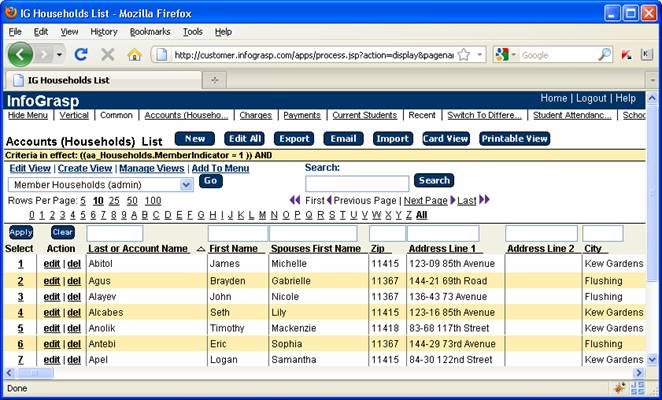
List View
The primary method for retrieving information is the List View.
The List view contains several display modes including Browse View, which is displayed below, Printable View Mode, Card View, Calendar View and Summary View, which will be described later:
Buttons
The following buttons may be available on any given transaction.
|
New |
Add a new row with new information. |
|
Edit All |
Edit all the rows at once on a single screen. |
|
Export |
Export the rows to Excel, Word or other formats. You will
be informed of how many rows you are exporting, and if the number of rows you
are exporting is greater than the number recommended by the Administrator,
you will be given a warning. |
|
Email |
Email the rows in Excel, Word or other formats to specific
email addresses. You will be informed of how many rows are in your list. |
|
Import |
Import an Excel tab delimited or comma delimited file (How to import will be explained later). |
|
Printable View |
Switch to Printable view where the data is displayed in a
way that is suitable for printing from the browser. However, browser printing
is usually not optimal and therefore it is recommended that you export your
data to Excel or one of the other formats. |
|
Card View |
Switch to Card View where the information is display vertically instead of horizontally. |
|
Calendar View |
Switch to Calendar View where the information is display in a calendar. |
View Management
Each transaction contains a lot of information; much more than you usually need. In order to narrow it down to the few categories that you need, you can create a view.
For example, you may have a transaction that includes all the information about a student, including his name, household information, class information and birthday. If you usually only need to see a list of student names and their birthdays, you can create a view.
Besides narrowing it down to specific information, you can also tell it how to display it (ex. Sort by class, bus stop, alphabetical, etc.). Views can be created, saved and shared with other users. Users will see their own views and the views shared by the administrator or other users
(See the Creating a Custom View section for view creation specifics ).
|
Edit View |
Edit and make changes to the current view being accessed. |
|
Create View |
Create a new view.
Clicking Create View will take any filters currently in effect and the
view currently selected as a starting point for the new view. |
|
Manage Views |
Rename, delete and hide views in the drop down. You can
only rename and delete views that you created. You can hide a view created by
you or others. |
|
View selection drop down |
Used to select a new view. The new view will be
automatically applied and the data returned unless you have checked off the
Do Not Automatically Execute Views box in the User Preferences accessible
from the Home page. |
|
Add to Menu |
Used to add the current view to your Navigation Menu. |
|
Delete from Menu |
Used to delete the current view to your Navigation Menu. |
|
Go |
Apply the currently selected view and clear all Search,
Quick Filter and Sorting criteria currently in effect. |
Search
You can search for specific information in a List.
Entering words in the search box and clicking the search button will search all non-numeric fields for the rows in the current filter only. If you want to search the entire table, choose All from the View drop down at the top of the page and then enter the search criteria. Click the Go button to clear anything you have previously searched for in your previous view.
Paging Links
The paging links allow you to page through your information
|
Rows Per Page |
Used to set how many rows to retrieve on each page of information. |
|
First Page |
Go to the first page of the list. |
|
Previous Page |
Go back one page. |
|
Next Page |
Go forward one page. |
|
Last Page |
Go to the last page of the list. This is helpful when you are in a Summary View and you want to go to the last page to display the Grand Total line. |
|
0-9, A-Z |
When available, these numbers and letters will bring up the page of the first row matching the letter pressed. This is based on the currently sorted column. You can tell which is the currently sorted column by the ^ indicator next to the column name. |
Quick Filters
The row of empty boxes above the column headers is the Quick Filter row.
This is the best way to search for specific rows when you know which column in which to search.
You can perform quick filtering by entering a value, a word, or a number above any column and pressing Enter or clicking the Apply button.
To clear a filter, press the Clear button.
Filtering reduces the number of rows in the list by limiting the list to rows that match the information you typed into the box.
More ways to use the Quick Filter:
1. Drop down filters, where present, will limit the list to rows with that exact value selected.
2. Date filters where present, will limit the list to the date entered or range of dates. You can specify a range by entering two dates separated by a comma. You can also specify one of the following special values: Yesterday, Today, Tomorrow, LastWeek, ThisWeek, NextWeek, LastMonth, ThisMonth, NextMonth, LastQuarter, ThisQuarter, NextQuarter, LastYear, ThisYear, NextYear, Last 7 Days, Next 7 Days.
Clicking the calendar popup icon ![]() will enable you to select a date or one of the
special values listed above.
will enable you to select a date or one of the
special values listed above.
Calendar Pop Up
The calendar pop up enables you to select a date (and a time where appropriate).
The special values (Yesterday, Today, Tomorrow...) enable you to easily select significant dates or ranges of dates.
After you have selected the date or date range you want, click the OK button to fill in the filter value box with that date.

Pop Up Filters
When you see this icon ![]() you can use a Pop-Up filter to select from a
list of values. There are two types of Pop Ups, Search Pop Ups and Selection
Pop Ups.
you can use a Pop-Up filter to select from a
list of values. There are two types of Pop Ups, Search Pop Ups and Selection
Pop Ups.
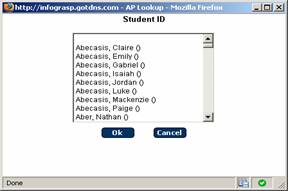
Search Pop Up
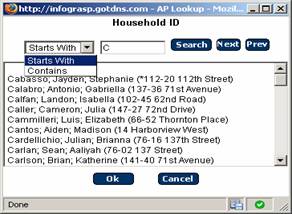
A Search Pop Up is used to make a selection from a large number of possible values.
Select either Starts With or Contains to specify how you want to search.
Enter the value you want to search for and click the Search button.
In the above example we are searching for Households that Start with the letter C.
You can search for any other part (ex.
Use the Scroll Bar and the Next and Prev buttons to find the entry you are looking for.
Highlight the desired entry and click the Ok button to fill in the filter value box with that value.
Selection Pop Up
A Selection Pop Up is used to make a selection from a number of possible values.
Use the Scroll Bar to find the entry you are looking for.
Highlight the desired entry and click the Ok button to fill in the filter value box with that value.
Text Filters allow you to enter a filter value if in the
quick filter field. Most quick filters are text filters.
Special filter operators can be entered in the quick
filter field before the value entered (make
sure you enter the periods before and after the abbreviations).
|
less than
filter value entered |
.LT. or < |
|
greater than
the filter value entered |
.GT. or > |
|
equal to the
filter value entered |
.IET. or =
|
|
not equal to
the filter value entered |
.INET. or <> |
|
values that contain
the filter value entered in any part of the column value |
.C. |
|
values that do not
contain the filter value entered in any part of the column value |
.DNC. |
|
values that start
with the filter value entered |
.SW. |
If you do not enter a filter value then the defaults are:
.C. (contains) for columns that are character.
.IET. (equals) for columns that are numeric.
.IET. (equals) for columns that are dates.
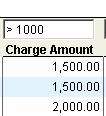
In the above example we are filtering for a Charge Amount greater than 1000.
Sorting
Clicking the column header will sort the list by that column in ascending order.
If the column is already the sorted column, clicking the header again will sort it in the opposite order.
![]() Indicates
column is sorted in ascending order.
Indicates
column is sorted in ascending order.
![]() Indicates
column is sorted in descending order.
Indicates
column is sorted in descending order.
By clicking the column header, you are making the clicked column the current column for 0-9 and A-Z positioning.
If you click a column header you are overriding any sort specified in the view.
Clicking the Go button will reset the view back to the original view specifications.
If you do not specify a custom view, the first column in the view is used for the sort.
Hint: If you click on the last character of the underline for the column header it will sort in descending order.
![]()
![]()
Select and Action Links
Select column. The row number indicates where in the list you are. If you click on the row number you will open a new screen - the Detail View for the row.
Hint: If you want to add data, select a similar existing row and then click Clone from the Detail View. This will make data entry very simple and fast (See Detail View for more information).
Action column. The two most common actions are edit and delete.
- Edit – if the transaction allows, click to edit information in the row.
- Delete – click to delete the entire row.
When selecting a row to view or clone, remember to click the row number and not the edit button
(Some transactions may have other action links specified ).
Special Functions
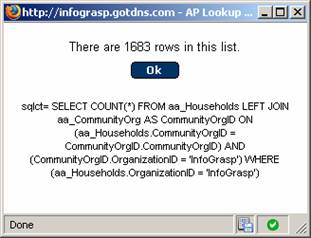
Get Row Count: When clicked will display the number of rows in the current view in a pop up window as well as the SQL statement used to retrieve the row count
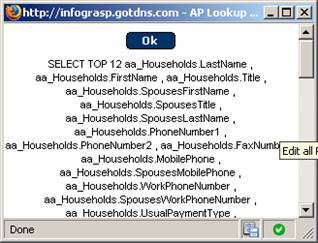
Show SQL: When clicked will display the current SQL syntax currently in place.
This is used mainly for advanced users.
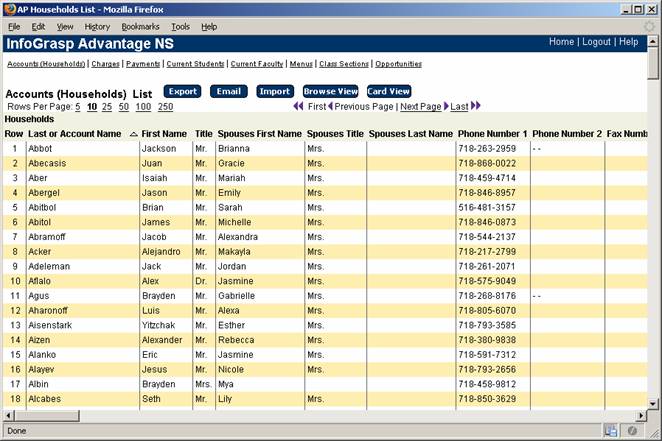
Card View
The Card View has the exact same functionality as the List View except that each row of data is displayed in a two-column format vertically, so you do not need to scroll to the right to see all the data.
You enable the Card View by clicking the Card View button from the List View or Printable View.
Printable View
The Printable View provides a display that is more appropriate for printing from the browser. The quick filters and Select and Action links are disabled in the Printable View.
This is suitable for quick printouts of your data.
For best printing results, export your data to Microsoft Excel “Formatted” and print from there.
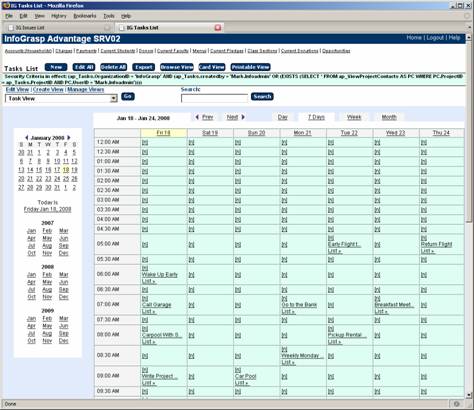
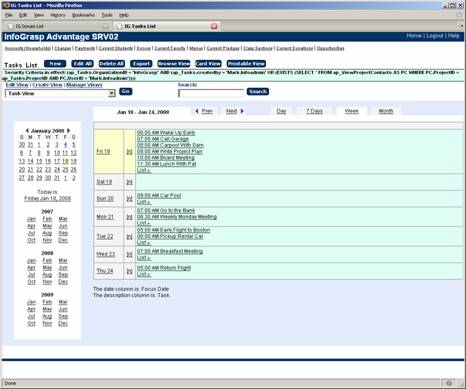
Calendar View
Month View
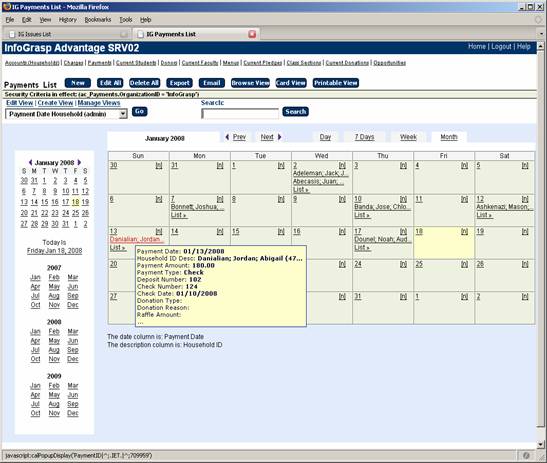
The Calendar View enables you to see your data on a Monthly, Daily, Weekly or 7 Day calendar.
The above display is the Month View.
To enable the Calendar View, click the Calendar View button from the List View, Printable View or Card View.
The date column used for display is the first date column defined in the view.
The description column used is the first column defined in the view that is not a date column.
In the example above, the date column is Payment Date and the description column is Household ID.
The current day is highlighted in yellow.
Move the mouse over any item to display a yellow tool tip box showing the first 10 columns of data defined in the view.
Click on an item to display a detail view of the item.
Click on the [n] for any date to pop up an edit entry allowing you to add a new item. The date will be pre-filled with the date where you clicked the [n].
If you click on the List> link, the list view will pop up, filtered for all the items for that date. If there are more items than can be displayed the word more will be displayed next to the List > link.
Day View
Navigation
|
Top of Calendar |
|
|
Prev |
Display the previous Day, Week or Month. |
|
Next |
Display the next Day, Week or Month. |
|
Day |
Display the Day View. |
|
7 Days |
Display the 7 Day View. |
|
Week |
Display the Week View. |
|
Month |
Display the Month View. |
|
|
|
|
Left Side Navigation |
|
|
Arrow to the left of the Current Month |
Display the previous Months. |
|
Arrow to the right of the Current Month |
Display the next Months. |
|
Today is Date |
Display Today. |
|
One of the Months for the Three Years Shown |
Displays that Month. |
7 Days View:
Week view:
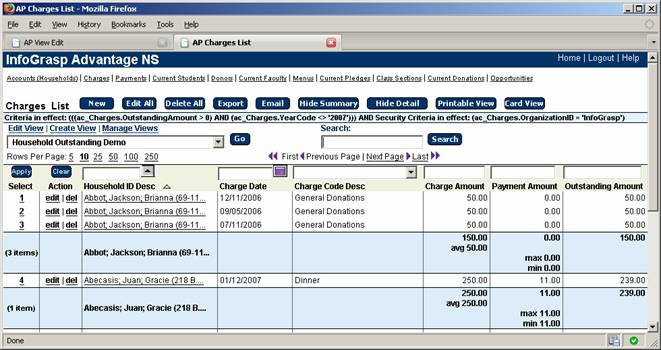
Summary View
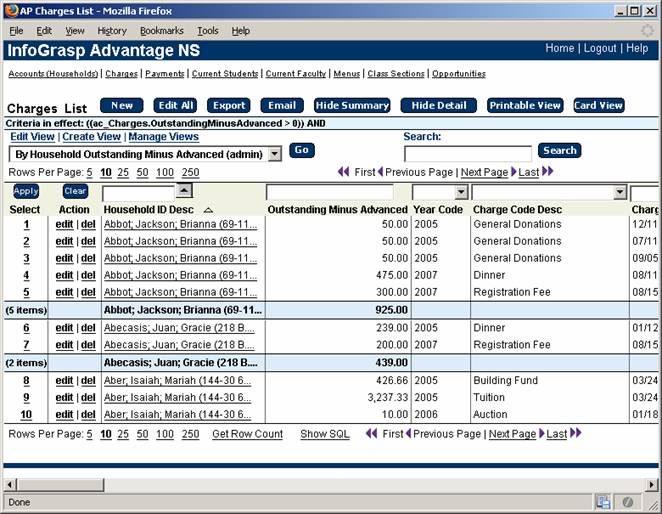
The Summary View shows information “Grouped” with summary totals after each grouping break.
In the above example, Household ID Desc groups the information with totals shown for each group break.
System Administrators may predefine summary views or you can create your own Summary view (see the Creating a Custom View topic):
In Summary View:
Hide Summary Button will change the view to a standard list view without Summary. Totals.
Hide Detail Button will change the view to show only the Summary Lines as illustrated in the next example.
Summary Only View
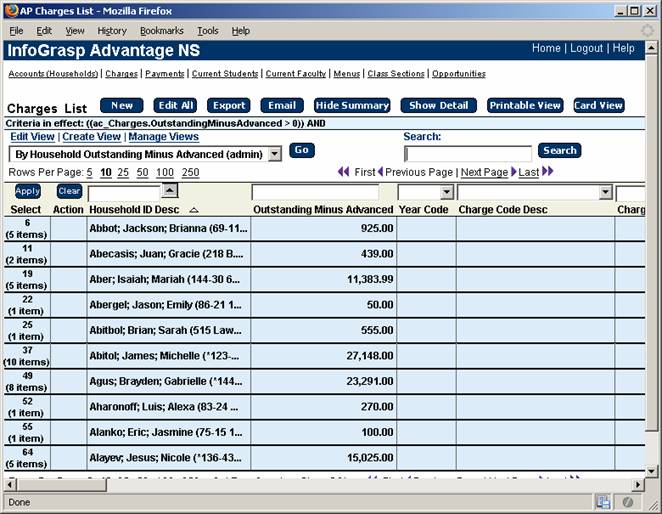
The Summary Only View is similar to the Summary View with the detail lines removed.
This allows you to see only the summary information, which will typically significantly reduce the number of rows you see. If you export this view only the Summary lines will be exported.
In Summary Only View:
Hide Summary Button will change the view to a standard List View.
Show Detail Button with change the view to the standard Summary Shows with detail lines.
Detail View
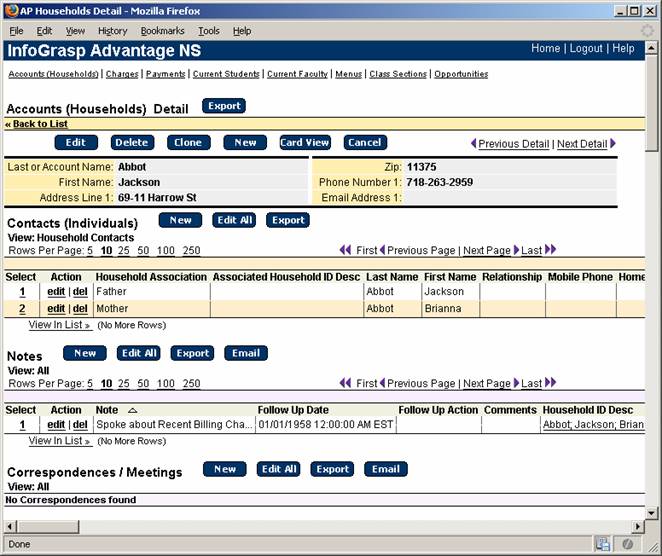
Overview
The Detail View provides information in a two-column display about a specific row.
Related information for that Row is displayed in additional sections on the page.
You can reach the detail view by clicking on a row number link in the Select Column from the List View.
Back To List link returns you back to the List View from which you entered the Detail View
Buttons
|
Export |
Export this row and all the related sections to Excel,
Word or other formats. |
|
Edit |
Edit the row (if the transaction allows editing). |
|
Delete |
Delete the row (if the transaction allows deletion). |
|
Clone |
Clone the current record (if the transaction allows adding
rows). |
|
New |
Add a new row (if the transaction allows adding rows). |
|
Card View |
Display all related transactions in Card View. |
|
Cancel |
Return back to the List View just like the Back To List
link. |
Navigation
|
Previous Page |
Go back one row in the list to display it in the Detail
View. |
|
Next Page |
Go forward one row in the list to display it in the Detail
View. |
Related Transactions
Besides the buttons on top, there are additional buttons in the sections under the Detail View for the currently selected row. These sections are called related transactions of the displayed row.
The following buttons are available for Related Transactions:
|
New |
Add a new related row (if the transaction allows editing). |
|
Edit All |
Edit all the related rows at once on a single screen (if the transaction allows editing). |
|
Export |
Export all the related rows to Excel, Word or other formats. |
|
|
Email all the related rows in Excel, Word or other formats. |
Navigation
Rows Per Page Select the rowsper page for this section.
First, Previous Page, Next Page and Last Page through the related transactions.
Select and Action Links
Selecting the Row Number will enable you to drill down in a new window to the details of the selected row.
Edit: Edit the rows (if the transaction allows editing ).
Delete: Delete the rows (if the transaction allows deletion).
If more related rows exist you can click on View in List to view the related rows in a list view.
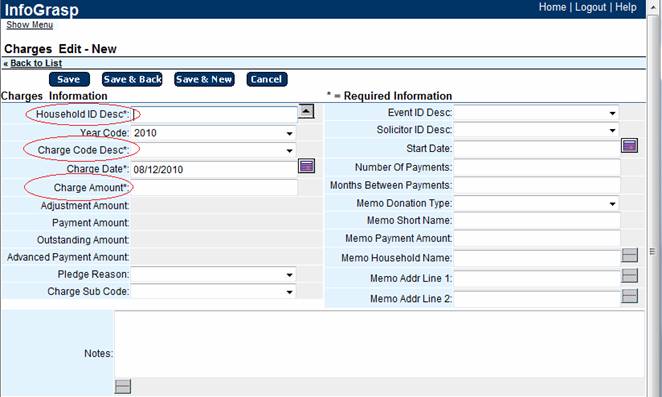
Adding Data
After navigating to
the appropriate transaction list, adding data begins by clicking on the “New”
button.
The full add screen
will open up, with required fields marked with a * (see below). Enter the desired information, including all
required fields, and click the Save Button.
The data will be added, and the refreshed screen will reflect the new
data.
Tip: If you want to add more
than one record at a time, click on “Save and New”. Your information will be saved, and the add
screen will clear, enabling you to add a second record. You can continue to do this until all records
have been added.
Editing Data
InfoGrasp provides
two main ways to edit data.
The standard method
enables you to update one row at a time.
The system also enables you to select a group of records, and then edit that group together.
Editing One Row at a Time
In order to edit a row,
you need to locate the record you wish to edit.
The first step is to
navigate to the appropriate transaction list.
Once there, you need
to locate the record that you wish to edit.
If you don’t see it
on the page, you can find the row by paging, using Quick Filters or using a
View.
Once you identify
the row you wish to edit, you can either click on the “edit” text in the Action column, or click on the row number
to get to the Detail Page, and then click the “Edit” button.
Either way will open
up the Edit screen, where the row can be modified.
|
Back To List |
Return to the List View without saving any changes. |
|
Save |
Save the current row and return to the view from which you entered the edit screen. If you are adding a row, you will be taken to the Detail View for the row you just added. |
|
Save and Back |
Save the current row and return you to the List View if you are adding a row. |
|
Save and New |
Save the current row and bring up a new row. This saves time by allowing you to add multiple rows. |
|
Cancel: |
Return to the view from which you entered the edit screen without saving any changes. |
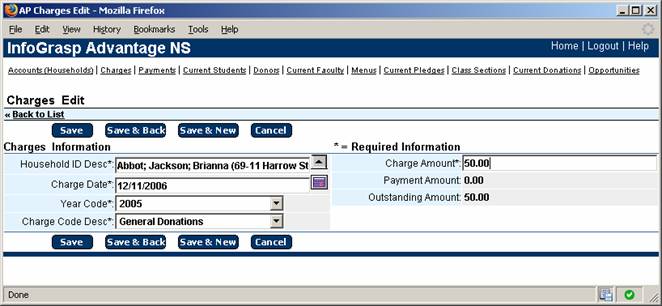
Data entry is free form.
Drop
Required fields are indicated with an asterisk (*).
Some columns might be defined as Read-only and cannot be edited as the Payment Amount and Outstanding Amount in the above display.
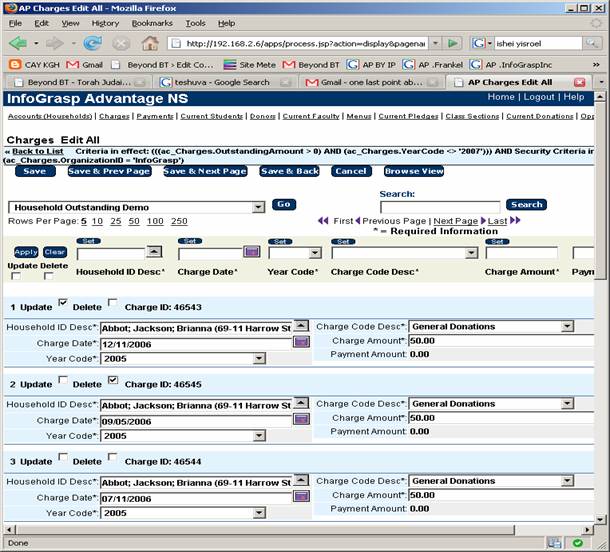
Edit All - Multi Line Editing
Edit All in Browse View
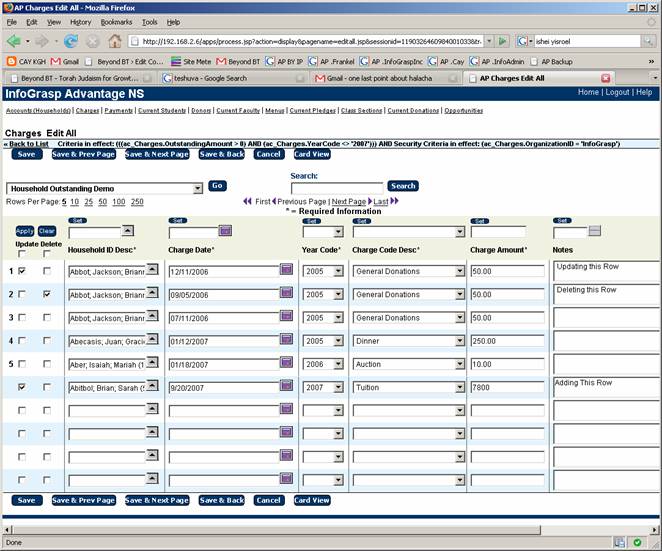
Edit all enables the editing or adding of multiple rows of data at once.
You can Select a View, perform a Search, set Rows Per Page, navigate through the data with First, Previous Page, Next Page and Last and Apply filters as described in the List View section above.
Views and Filters are applied and any existing rows found are displayed.
At the bottom of each page a number of blank rows (usually 5) are displayed to enable the adding of new rows.
Data is entered in the columns as described in the edit screen.
Check the Update box to indicate that you want to update a specific row. YOU MUST check this box or the new data that you entered will not be saved, even if you click SAVE.
Check the Delete box to indicate that you want to delete a specific row.
Check the Update box on a new row (no selection number) to indicate that you want to add a row.See the screen above for an example of an update, delete and add.
|
Back To List |
Return to the List View without saving any changes. |
|
Save |
Add, update or delete the specified rows and remain on the Edit All page. |
|
Save and Previous Page |
Add, update or delete the specified rows and take you to the previous page of data on the Edit All page. |
|
Save and Next Page |
Add, update or delete the specified rows and take you to the next page of data on the Edit All page. |
|
Save and Back |
Add, update or delete the specified rows and return you to the List View. |
|
Cancel |
Return to the view from which you entered the edit screen without saving any changes. |
Card View gives you a different way to edit the data and will be illustrated below.
It should be noted that in some cases depending on the filters and the sorts and the changes you make to the data, the row order and therefore the paging order may change after you click one of the Save buttons.
The Set button allows you to change values for multiple rows at one time. Enter the value in the box below the set button and press the Set button for that column. All rows checked for Update will be set to the entered value. You still must click one of the Save buttons to save the changes.
Edit All in Card View
Click the Browse View button to return to the browse view of Edit All.
Deleting Data
Just as with editing data, InfoGrasp provides you with two ways to delete data. You can either pick a single row to delete, or you can delete multiple rows on the same screen.
Deleting One Row at a Time
The process for
deleting a row is nearly the same as editing a row. You need to select the specific row that you
wish to delete, either using a view or quick filters. Once you see the record
on the screen, you can delete the record by clicking on “
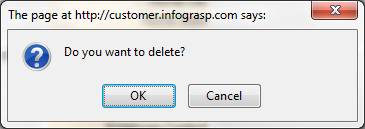
This will prevent you from inadvertently deleting the wrong record. Once you select “OK”, the record will be permanently deleted. You should see the following message appear on top of the screen: “Row Successfully Deleted .”
Note that if the row
has dependent information associated with it, then deletion will not be
allowed. For example if you are trying to delete a Household, and the Household
has existing Charges, you will not be permitted to delete the Household unless
all the Charges and any other dependent items are deleted first.
Deleting Multiple Rows at Once
You can also delete multiple rows simultaneously, using the same process as Edit All (above). Just as with edit, use quick filters or create a view to find the rows that you wish to delete. After clicking the “Edit All” button, you will see all the rows that appeared on the screen open for editing. However, instead of editing any records, click the “Delete” check box at the beginning of each row that you wish to delete. When you are sure that you have checked the correct records for deletion, click “Save” to finalize the deletion.
Tip: You can turn on the “Delete” check box for all rows by clicking on the “Delete” check box that appears immediately above Row 1.
Tip:
If you are deleting rows that appear on multiple pages, you can click “Save
& Next Page” and InfoGrasp will delete the selected rows, and immediately
open up the next page of data for editing and deleting.
Editing and Deleting Multiple Rows at Once
As described above, the “Edit All” button opens up all rows for both editing and deleting. You can click on “Update” for the rows that you wish to edit, “Delete” on other rows, and make all other changes on the screen. When you are ready, clicking the “Save” button will both update the rows that are marked for updating, and delete the rows selected for deletion. If successful, you should see the message: “1 Update(s); 1 Delete(s); Were Successful.” appear on top of the screen.
Exporting Data
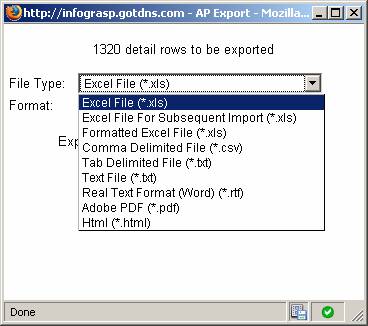
The rows in your list can be exported in a variety of file types and formats.
The message at the top, informs you of how many rows to export.
File Type: Select the file type that you want to Export.
|
Excel File |
Excel Tab Delimited Format (a regular spreadsheet). |
|
Excel File for Subsequent Import |
Excel Tab Delimited Format with the actual table column names displayed and a special Action column added. This format can be used to export data to Excel, change it and then import the updates. |
|
Formatted Excel File |
Excel Tab Delimited Format with some additional formatting. |
|
Comma Delimited File |
File where each column in each row is delimited (separated) by a comma. |
|
Tab Delimited File |
File where each column in each row is delimited (separated) by a tab character. |
|
Text File |
File where each column in each row is the fixed length of that column. |
|
Real Text Format |
Word compatible file. |
|
Adobe PDF |
Standard PDF file. |
|
Html |
Standard Html file. |
RTF and PDF (Word and Adobe) have fixed page widths in both portrait and landscape mode so you should limit the number of columns in your view (less than 10) for these file types.
RTF and PDF will also limit the number of rows that can be exported to a maximum of 25,000 rows of seven columns.
Format: After you select the file type, you will need to select the format – the way the information will appear after you export it. You can select either List or Detail Single Column.
1. The List format is similar in structure to the List View.
2. The Detail Single Column is similar in structure to the Card View but the data is displayed in a single column as opposed to the double column display of the Card View.
Emailing Data
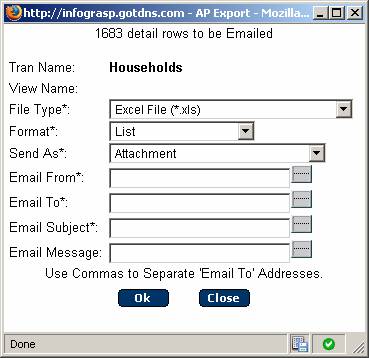
The rows in your list can be emailed in a variety of file types and formats.
The message at the top, informs you of how many rows will be emailed.
All the fields with an asterisk must be entered.
File Type: Select the file type that you want the Email to open as (see Exporting Data).
Format: Select the export format of either List or Detail Single Column (see Exporting Data).
Send As: Attachment sends the data as an email attachment.
Link sends a link to the transaction and view that you are currently viewing.
Inline sends the data in the body of the email message and can only be selected for File Types of Text and Html.
Email From: Enter a valid email address that you wish to
appear on the “From” line of the email.
Email To: Enter a valid email address to where you wish to send the
email. If multiple email addresses are entered they must be separated by
commas.
Email Subject: Type the subject line of the message.
Email Message: Type the message that will appear in the body of the email.
When all the data is entered, click the Ok button to send the email.
Importing Data

If the transaction is enabled to Import Data clicking, the Import button will bring up this dialog.
File Type: Select the file type of the import file as Tab Delimited (.txt) or for Excel, Comma Delimited (.csv).
File To Import: Enter the path and the file name of the file you wish to import or Browse to find the file.
Import files must
have on their first row the exact column heading names as the columns in the
table. Click on the Show SQL button
(at the bottom of the screen) to display the exact column names for the
table. The column names are to the right of the period after the table
name i.e. aa_Households.FirstName. FirstName is the column name.
If no __Action__ column is present, then all the rows will be added to the transaction list.
Optionally, you can make the first column name as ”__Action__”. This will enable InfoGrasp to use the value of this column to decide on a row-by-row basis how the importing will be done. If the value of the column in the row is A, then InfoGrasp will add the row. If it is U, then the system will update the existing row. If it is D, then the row will be deleted. If you export a file using the Excel File for
Subsequent Import then the action column will automatically be included with a default value of U for each row.
If no __Action__ column is present, then all the rows will be added to the transaction list.
Example with no __Action__
column:
LastName, Firstname, PhoneNumber1, MobilePhone, AddressLine1, City, State
Smith, John, 212-333-4444, 917-736-9383,
Jones, Martha, 201-222-3938, 347-393-9393,
Example with __Action__ column:
__Action__, LastName, Firstname, PhoneNumber1, MobilePhone, AddressLine1, City, State
A, Smith, John, 212-333-4444, 917-736-9383,
U, Jones, Martha, 201-222-3938, 347-393-9393,
Creating a Custom View
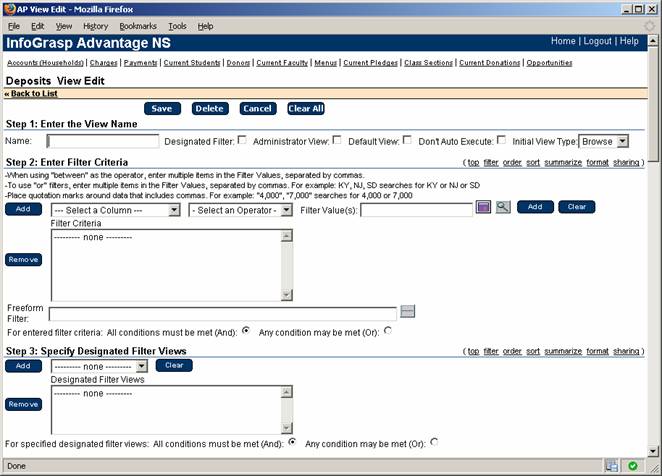
Overview
As previously mentioned, the transaction that includes all the information about a student may include his name, household information, class information, birthday, and bus stop. If you often need a list of only student names and bus stops, you will want to Create a View. The View Edit screen is used to create new views and edit existing views.
Administrators can create special Administrator Views that are accessed by all users of the application.
Everyone can create, save and share views with other users.
Once defined and save, the created views can be selected from the View: Drop Down on the List View.
Users will see their own views, administrator views and views shared with them.
Users cannot change an Administrator's or other user's views, however, they can use those views as a baseline and make changes and save them under a new name.
When the View Edit page is initially displayed, it will list all the values in the original View selected and all quick filters specified in the List View. This saves the users time by allowing the user to use the List View to narrow their selection and then Create A View to add additional criteria and to save it.
Buttons and Links
Back To List: Return back to the List View without saving changes.
Save: Save the view and return to the List View with the saved view selected.
Delete: Delete the view.
Cancel: Discard changes and return to the List View just like the Back To List Link.
Clear All: Clear all the fields in the View Edit page. This is useful if you want to discard the entries that were pre-populated from an existing Quick Filters or View.
Step 1 - Enter the View Name
- Name: Name your View.
- Designated Filter: Place a check mark in this box if you want to mark this view as a Designated Filter that can be used in other views in Step 3. - Specify Designated Files.
- Administrator: Administrators can check this box to make this view available to all users. When displayed in the View: Drop Down, administrator views will have (admin) following the name.
- Default View: Administrators can check this box to make this view the default view when a user first visits this transaction.
- Don't Auto Execute: Checking this box specifies that this view should not automatically be executed when it is selected. The user must click the Go or any other applicable button or link to apply the view and retrieve the data. This is useful for long running views or views where additional filter criteria are usually entered before executing the view.
- Initial View Type: Specifies whether the view should initially come up in Browse View, Card View, or Printable View.
Step 2 - Enter Filter Criteria
Filter Criteria allow the user to enter the filter conditions. Multiple filter conditions can be added.
Select a Column specifies the column on which to filter.
Select an Operator specifies what operator to apply to the column. You can choose from the following operators:
Starts With Contains Does Not Contain Equal To
Not Equal To Less Than Greater Than Between
Filter Values are specified in this text box.
Ø When using "between" as the operator, enter multiple items in the Filter Values, separated by commas. To use "or" filters, enter multiple items in the Filter Values, separated by commas. For example: KY, NJ, SD searches for KY or NJ or SD.
Ø Place quotation marks around filter values that contain commas. For example: "4,000", "7,000" searches for 4,000 or 7,000.
Ø
If you are specifying filter values for a date
column, then click the date popup ![]() icon to load the date selection popup.
icon to load the date selection popup.
Ø
If the column you are filtering has a Lookup
List defined, click on the magnifying glass icon ![]() to select from a list of values. You can
select multiple values from the list.
to select from a list of values. You can
select multiple values from the list.
Click the Add button when you have completed entering the filter criteria for a column to add it to the Filter Criteria list.
Click the Clear button to discard and clear the filter entry values.
Click the Remove button to remove filter criteria after you have selected and highlighted the criteria to be removed from the Filter Criteria list.
Freeform Filter: Advanced users can use the Freeform Filter to specify additional filter criteria.
For entered filter criteria:
All conditions must be met (And):Any condition may be met (Or):
Select one of these options to specify whether all conditions must be met or any condition must be met when multiple filter conditions are specified.
Step 3 - Specify Designated Filter Views
Select a previously created view, which was checked as a Designated Filter.
Click the Add button to add it to the Designated Filter list.
Click the Clear button to discard and clear the currently selected entry
Click the Remove button to remove a Designated Filter after you have selected and highlighted the Designated Filter to be removed from the Designated Filter list.
For specified designated filters:
All conditions must be met (And):Any condition may be met (Or):
Select one of these options to specify whether all Designated Filters must be met or any condition must be met when multiple Designated Filters are specified.
This option is useful for reusing criteria.
For example, you have saved a Designated Filter View of specific Households called My Households and specify it as a Designated Filter. If you would like to filter by these Households in a new View that you are creating, you can add the My Households view in this step.

Step 4 - Select Columns and Column Order
You can specify which columns to include and the order in which they appear.
You can also specify some specific options for the column display.
- Eliminate Duplicate Rows: If this box is checked, all exactly duplicate rows in the list will be eliminated (Note: This box will generate a Select Distinct SQL statement).
- Wrap Headings: Check this box to cause Column Headings to wrap (continue on the next line)
- Wrap Cols: Check this box to cause Column data to wrap on each line.
- Only Select Cols on Detail: Normally when you drill down into detail all the columns for the row will be displayed. If you check this box, only the columns selected for the view will be displayed.
- Only Select Cols on Edit: Normally when you edit all the columns for the row will be available for editing. If you check this box, only the columns selected for the view will be editable.
- Max Col Width(Default:30): If a column is greater than 30 characters, the trailing characters will be truncated and ... will be displayed. Use this entry to increase or decrease the maximum column width for all columns. This can be done for individual columns in Step 7.
- Chose the columns to display and the order. All columns with an asterisk(*) next to them will be displayed.
To change a columns display status (i.e. add or remove the asterisk),
Highlight the column name or highlight multiple column names (using Ctrl-Click) and then click the On/Off button. Double clicking on any column will also change the display status.
- Click the All button to select all the columns. Click the None button to deselect all the columns.
- To
Order the Columns
Highlight the column name or highlight multiple column names (using Ctrl-Click) and then click:
The Top button to move the column(s) to the top.
The Up button to move the column(s) up one postion.
The Down button to move the column(s) down one postion.
The Bottom button to move the column(s) to the bottom.
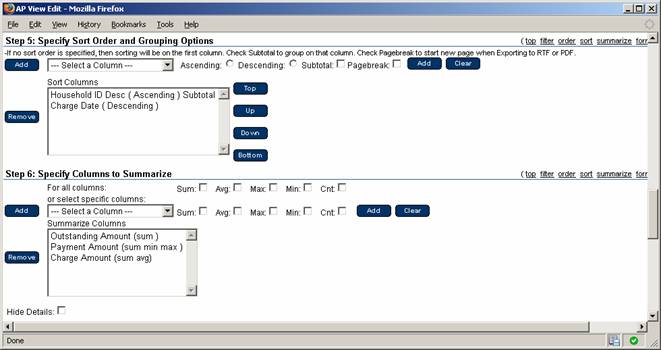
Step 5 - Specify Sort Order and Grouping Options
By default, the columns are sorted by the first column displayed.
To Add a Sort Column, select a Column from the drop down list
- Select Ascending or Descending.
- Check the Subtotal box to create Summary Total Lines whenever this column's value changes (See Summary View).
- Check the Pagebreak box to go to a new page on RTF and PDF exports whenever this column's value changes.
- Click the Add button to add the current specified entry to the Sort Columns List.
- Click the Clear button to clear the current entry.
To Remove a Sort Column, Click the Remove button after highlighting the Column Name in the Sort Column list.
To Reorder the Sort Columns, highlight the Column Name in the Sort Column list and then click:
The Top button to move the column to the top.
The Up button to move the column up one postion.
The Down button to move the column down one postion.
The Bottom button to move the column to the bottom.

Step 6: Specify Columns to Summarize
Here you can tell your View to summarize your data on the Summary lines created whenever a the value of Subtotal designated column (from Step 5) changes.
If no Subtotal column is specified then only a Grand Total Line will be displayed on the last page.
For all columns enables you to display Summary Values for all columns in the view where appropriate (ie. Sum and Avg only makes sense for numeric fields).
Sum - Display the Summary of all the values.
Avg - Display the Average of all the values.
Max - Display the Maximum value.
Min - Display the Minimum value.
Cnt - Display the Count of the number of rows disregarding the actual values.
For specific columns
Select a Column from the drop down list.
Select Sum, Avg, Max, Min, Cnt as described above. Multiple selections can be made.
Click the Add button to add the current specified entry to the Summarize Column list.
Click the Clear button to clear the current entry.
To Remove a Sort Column
Click the Remove button after highlighting the Column Name in the Summarize Columns list.
Check the Hide Details check box if you want the view to initially display the Summary Rows Only.
Example Sort and Summary
The above display was created using these parameters in Step 5 and Step 6.
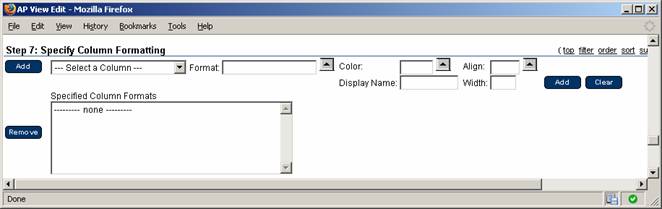
Step 7:
Specify Column Formatting
This step is used to specify column formatting.
To Add a Column Format
- Select a Column from the drop down list.
- Format
for date fields, click the Pop Up Icon
 and select from the following list.
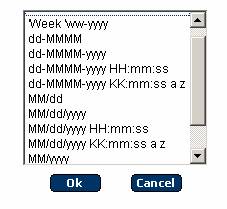
There are some special column formats where the Format is used which will be described below.
- Color:
click the Pop Up Icon and select from the Color list or add a
hexadecimal color values such as #F9EAF4 to specify a specific color for
this column.
- Align:
click the Pop Up Icon and select from the list or enter left,
center or right in the text box. As a default, text and date columns align
left and numeric columns align right.
- Display Name: enter an alternate column header name in the text box.
- Width: enter a number to change the default width of the column.
Click the Add button to add the current specified entry to the Column Format list.
Click the Clear button to clear the current entry.
To Remove a Sort Column
Click the Remove button after highlighting the Column Name in the Column Format list.
Special Column Formats The following can be selected in the Select Column drop down.
All Date Columns will apply the specified format for all date columns in the view.
Report Title will print the report title entered in the format field on the top of PDF and RTF exports.
PDF RTF Orientation will use the orientation specified on PDF and RTF exports. Valid values are Portrait or Landscape.
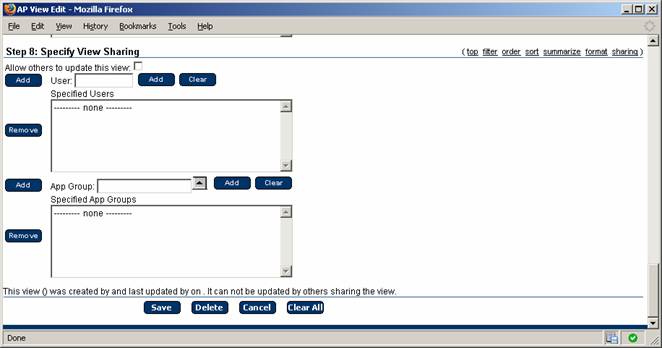
Step 8:
Specify View Sharing
View sharing enables you to share your view with other users or App Groups of users (if they have been set up for your organization).
To Add a Sharing User
Enter the User ID.
Click the Add button to add the current specified entry to the Specified Users list.
Click the Clear button to clear the current entry.
To Remove a Sharing ort Column
Click the Remove button after highlighting the User ID in the Specified Users list.
To Add a Sharing Group
Enter the App Group name
Click the Add button to add the current specified entry to the Specified App Groups list.
Click the Clear button to clear the current entry.
To Remove a Sharing Group
Click the Remove button after highlighting the App Group in the Specified App Groups list.
TUTORIAL – Standard InfoGrasp Interface
In this tutorial, we are going to add new personnel to our database, edit some of the data that we entered, and then edit and delete records. For the purpose of this tutorial, we will work with four fictitious employees: Socrates Sherman, Madeline A. Proper, Aristotle Sheldon, and Andy Anderson.
Adding Rows
1. If you are not yet on the Home screen,
click “Home” on the top right corner of the screen.
The “Home” screen lists all the possible transactions that you have security to utilize. Notice that the Home screen is organized by subject matter, starting with “Account Management” and “Accounting” on the left, through “Academic – Classes” and “Administration” on the right of the screen. Each subject, such as “Academic – Classes” is broken down into sub-classes such as “Class Sections”, “Class Section Reports”, “Faculty”, “Reports”, and more. Finally, beneath each sub-class you will see the specific transactions that you can click on and open up.
2. From the Home screen, under the “InfoGrasp
Support” section and “Training Test Grounds” sub-section of the screen, click
on “Test Personnel”.
This screen will display a full list of “Test Personnel”. When this list is active, you can see the full personnel list at a glance and sort and search on the list. We will now add our four fictitious employees to the screen.
3. Click the “New” button on the top of the
screen, to the right of the “Test Personnel List” title.
This opens the screen for adding new records. Notice on the screen that you see two columns of fields to enter. However, there are no fields marked with a “*”. This means that you are not required to enter any specific field. You will probably never enter all fields on this screen, but InfoGrasp provides you with the capability of entering very comprehensive information should you wish to do so. Notice that some of the fields, such as “Gender”, do not let you directly enter information. Instead, you need to click on the down-arrow to select either “M” or “F”. The icon next to the “Birth Date” brings up a calendar to easily select a date. The Up-Arrow on the “Title” line enables you to select from possible titles already stored in the system.
4. Enter “
This will add our first employee to the Test Personnel list, and reopen the screen for adding more personnel. You should see “Row Added” after you pressing the button.
5. Continue to add the other names: Madeline
A. Proper, Aristotle Sheldon, and Andy Anderson.
After the first two names, click on “Save & New”. However, since Andy Anderson is the last name to add, click on “Save and Back”. This should bring us back to the Test Personnel list, which should display the four employees that we added.
Editing Multiple Rows
6.
On the “Test Personnel List” screen, enter
“S” above the Last Name and click “Apply”.
This Quick Filter will display all personnel with an “S” in their last name. The screen should now show Socrates Sherman, Aristotle Sheldon, and Andy Anderson, because each contains an “S” in their last names. These are the names that we want to edit.
7.
Click
the “Edit All” button
All the personnel including the three we entered should appear on the edit screen. Notice that the “Current Employee” column is not checked for any of these names. We would like to designate that each of these three employees are current employees.
8.
Check
the “Update” box next to our three new faculty entries.
The “Update” box tells InfoGrasp that these records can now be edited. Now, to designate each of them as Current Employees, we could click the “Current Employee” text box on each row, one at a time. However, there is a better way:
9.
Above
the “Current Employee” button, click the check box and then click on the “Set”
button immediately above the box you just checked.
The “Set” button copies the entry below the button to every record that
is checked for update. You should see
the “Current Employee” button checked for each of these three records. This is a very useful feature for rapidly
updating multiple records.
10. Click
“Save & Back” and then “Clear”.
“Save & Back” returns us to the Test Personnel List. Clicking “Clear” removes our quick filter,
which limited us to view only personnel with the letter “s” in the last
name. We should now see the full
personnel list again with a “Check” mark in the “Current Employee” column next
to the three records that we updated. We
should not see a “Current Employee” check mark next to “Madeline A. Proper”,
because we did not update this record.
Deleting and Editing Multiple Rows
The school has determined that Greek classics are out, and Victorian is
in. We are now going to simultaneously
designate Madeline A. Proper as a Current Employee, and delete our “Socrates”
and “Aristotle” employees.
11. Click
“Edit All”
This opens up the edit screen for all of our employees. From this screen we can edit any field for
any employee, as well as deleting any employee.
Locate the four employees that we entered at the beginning of this
tutorial.
12. Check
the “Delete” box next to Socrates Sherman and Aristotle Sheldon.
We have now designated that when we finish all of our changes, these
two employees will be deleted from the system.
13. Click
the “Update” box next to Madeline A. Proper, and check the “Current Employee”
box for this Current Employee.
Without checking the Update box, we would be unable to update the
record. Note that the order that we
check the boxes does not matter, so long as when we click the “Save” button
that the “Update” box is checked.
However, the order is important if we use the “Set” button to propagate
a setting to multiple records, because InfoGrasp will only copy the entry to
those records that have the “Update” box checked.
14. Click
the “Save & Back” button.
The Test Personnel List should reappear. You should see the message 1 Update(s); 2 Delete(s); Were Successful.”
appear on the top of the screen.
Aristotle and Socrates should no longer appear in the list, and Madeline
A. Proper should be “checked” as a Current Employee. Note that we could have alternatively clicked
the “edit” or “